The graphical system provides a means for the station mentor to apply changes to the data via mentor "edits".
This document contains some examples of various edit types that can be made. In general, the system is designed to provide flexibility to allow for most required changed to be made with edits. Most edits are applied for the whole time range specified, but conditions can be set by specifying a trigger. Triggered edits apply when data are both within the time range and the trigger is active.
Change Active Size Selection
There are cases where the true size selection does not match the acquisition system reported one. For example, the rotary valve has failed and become stuck in one position.
In this case an edit that changes all data of one cut size to the other one is required. This is often made while the failure is in effect and left as an open ended edit with no end time (as shown below). If an open ended edit is used, be sure to close it (set the end time) when the system is repaired.
-
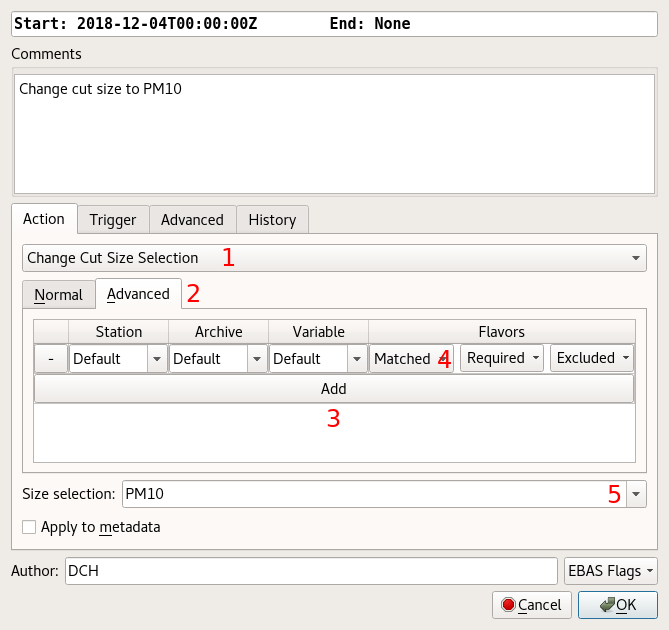
Select the edit type to "Change Cut Size Selection". This will change the parameter selection display once selected.
-
Select the "Advanced" tab in the variable selection area. This is required to specify data by cut size, instead of by variable.
-
Press the "Add" button to add a selection entry.
-
In the newly added selection entry, change the flavors selection from "Default" to "Matched". Once matched flavors are selected, the "Required" drop down will appear next to it. From the required drop down, select the cut size that is being altered. For example, if changing data PM1 data to PM10 (the impactor is stuck on PM10), select PM1 here.
-
In the target size selection at the bottom, select the desired final size selection. If, as above, the impactor is stuck on PM10, select PM10 here.
Remove Low Transmittance Absorption Data
In CPD3 the removal of data when the transmittance of a filter based absorption measurement is low (less than 0.5) became optional. In the previous systems, this was part of the Bond et al. 1999 correction, because it was known to be invalid in those regions. However, since at some point better corrections will become available (e.g. CTS), the removal was separated out and now requires an explicit mentor edit.
The mentor edit to remove low transmittance data consists of a fairly standard invalidate edit, but with a trigger that causes it to only apply when the transmittance is below a threshold. For CPD2 and CPD3 data, where the transmittance is correctly size selected, this is fairly simple. Older data requires an explicit change to the edit to make sure the transmittance is combined correctly with the corresponding absorptions. For this reason, it is generally advisable to make two edits: one for the older non-split that ends when the system was switched to CPD2 data and one ongoing one for all newer data.
-
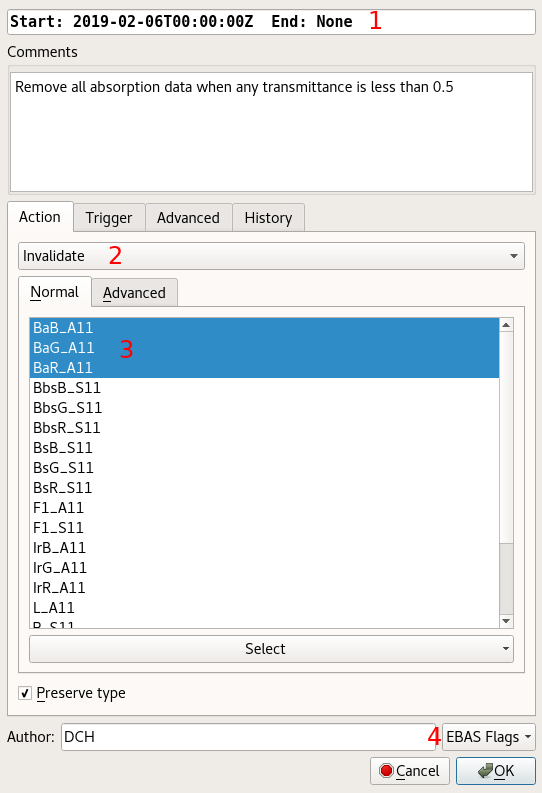
For ongoing edits, set the end time to "none" to indicate that the edit has no current stop time. The start time should be set to the start of the absorption data or the start of newer (CPD2 or CPD3) data, if using two edits (recommended).
-
Make sure the edit type is set to "Invalidate".
-
Select the absorptions for the instrument. If the instrument transitions from one to three wavelengths, make sure all three are selected.
-
Ensure that no EBAS flags are set.
-
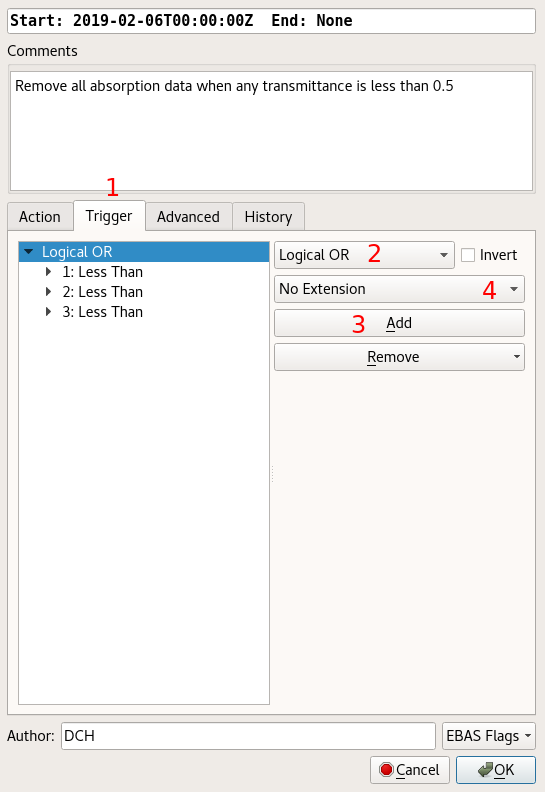
Change to the "Trigger" tab.
-
Set the top level trigger type to "Logical OR". This combines multiple conditions, activating the edit when any of them are met. Here, this is used to invalidate the data when any transmittance is low.
-
Press the "Add" button three times, to add three conditions to combine.
-
OLD DATA ONLY: For older and unsplit data, it is often advisable to set an extension time. This is required because the old transmittance data is not aligned or synchronized with the absorptions. So, for that data, setting a "Symmetric Extension" with a time equal to "15 minutes" (the transmittance reporting interval) generally prevents some artifacts (isolated points and lack of data removal).
-
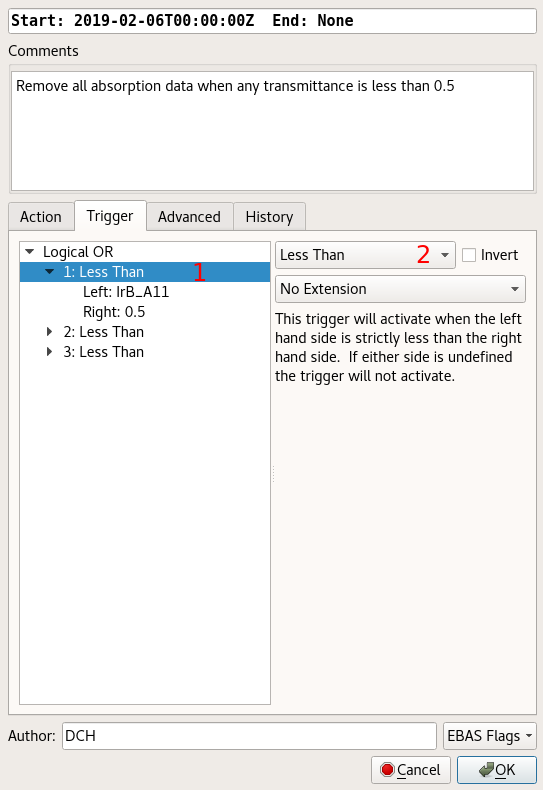
Select one of the conditions. It may be necessary to expand the the "Logical OR" top level element by clicking on the arrow near it. This will initially read "Always" until the type is changed.
-
Set the type to "Less Than". This will change the type on the left and allow the element to be expanded.
-
Select the "Left" element of the inequality. As before, it may be necessary to expand the "Less Than" element first.
-
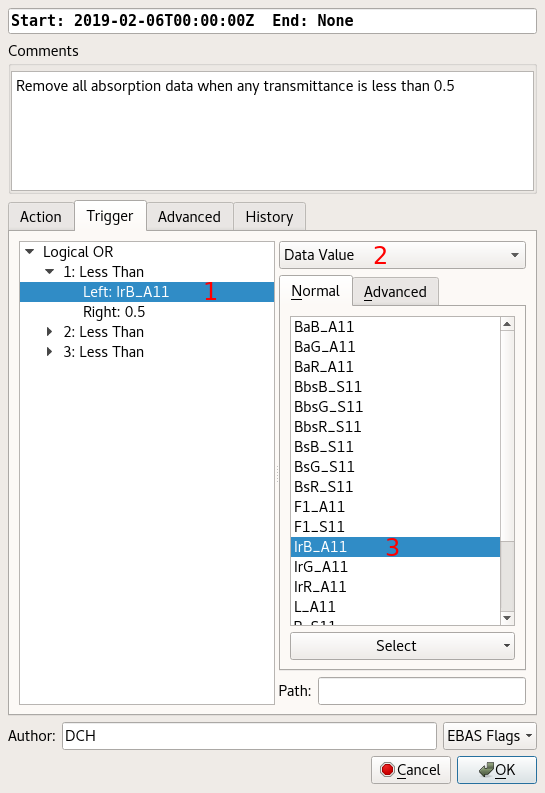
Change the input type to "Data Value".
-
Select the transmittance as the input to this side of the inequality.
-
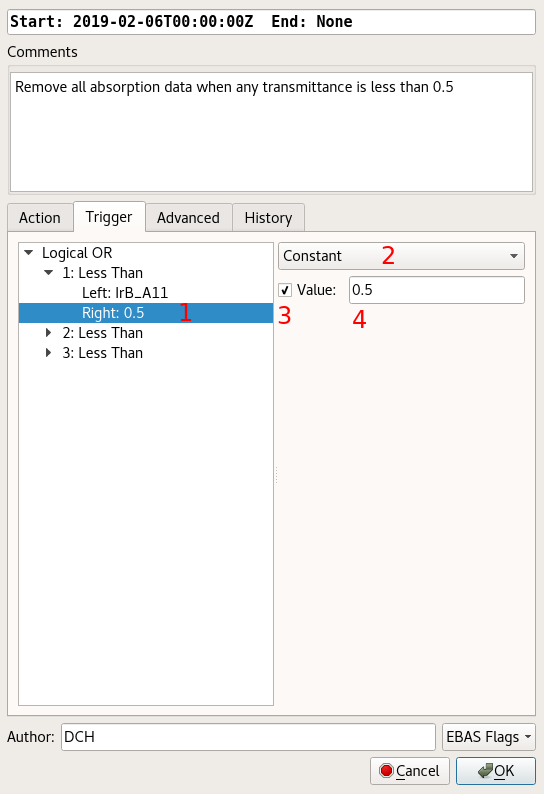
Select the "Right" element of the inequality.
-
Change the input type to "Constant".
-
Select the checkbox to indicate that the constant has a defined value.
-
Enter the threshold for transmittance invalidation (0.5).
Repeat the inequality setting process for the remaining wavelengths.
-
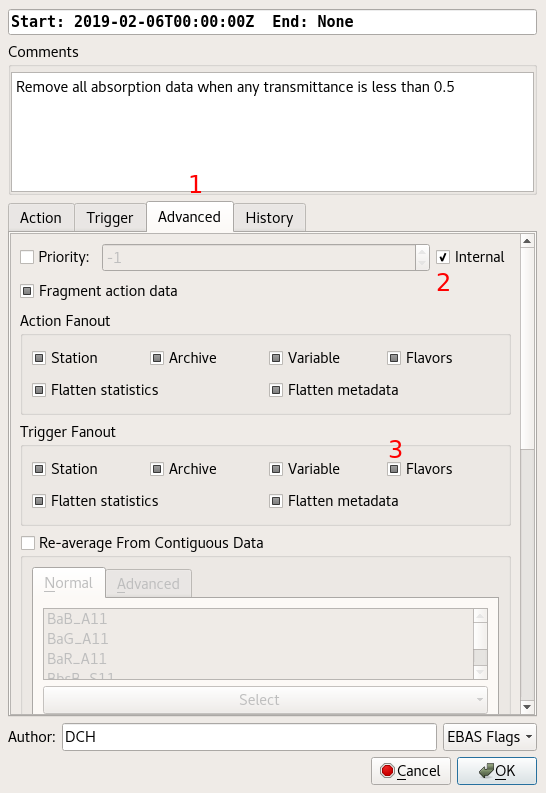
Change to the top level "Advanced" tab.
-
Check the "Internal" box. This causes the edit to be hidden in the edit directives list unless "Display → Show System" is selected from that window. Hiding the edit is optional, but recommended because it is always in effect and would distract from the actual explicit edits.
-
OLD DATA ONLY: For the older unsplit data, you MUST uncheck the "Flavors" box in the "Trigger" section. This is required because the cut size selection is a "flavor" of data, and when it is set, the system will not look for "unknown/whole air" transmittance data when trying to apply the trigger to size selected data. Note that this has no ill-effects on properly split data, but since it should usually be combined with the extension (which does) it should simply be combined into a single old data edit.
Extend Zero Flush Time
When a nephelometer zero flush time is insufficient, the data after the end of the flush can exhibit a recovery period while it returns from zero to the normal sampling value. For example, after a zero, the data trace can be seen to slowly climb back up then stabilize at about the value it was before the zero. This can happen when the flow rate is insufficient for the flush/blanking time.
To correct for this case, a periodic edit can be used. This edit is a simple invalidate of the data (often nephelometer scattering and CLAP absorption), with a trigger that activates during and slightly after the zero. So, the edit time range would be the whole time of the affected data and the trigger would be a one hour periodic activation.
-
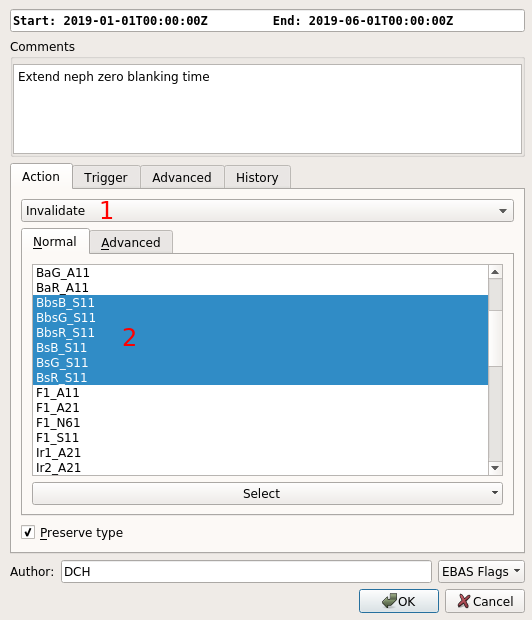
Make sure the edit type is set to "Invalidate".
-
Select the variables affected by the flush.
-
Change to the "Trigger" tab.
-
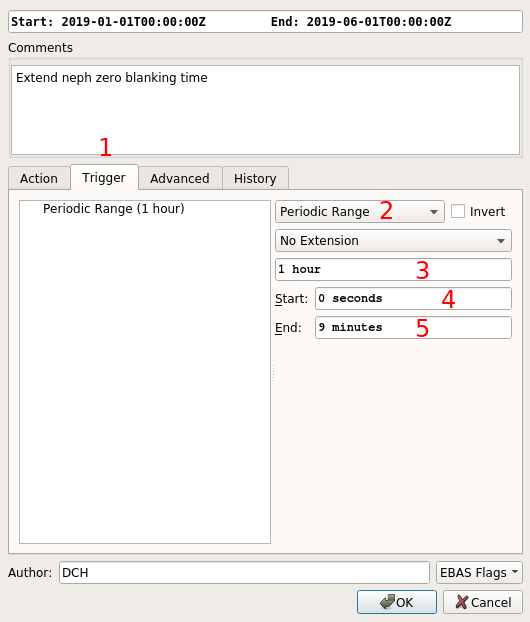
Change the trigger type to "Periodic Range". This type allows a range of data from a start and end within an interval to be selected. If only specific moments are required (e.g. every 6th minute), use the "Periodic" type instead.
-
Set the total period time. Enter "1 hour" because the nephelometer zeros happen on an hourly basis.
-
Set the start time to "0", indicating that the edit will start at the top of the hour. This is the amount of time after the interval start, so zero means zero seconds after the hour changes.
-
Set the end time of the invalidation within the hour.