3. WEDGE CALIBRATION
3.1 Introduction
The optical density wedge has a pivotal role to play in the Dobson
instrument, and the accuracy of its density calibration is crucial to
the accuracy of the ozone estimations. Originally, Dobson (1931)
confidently assumed the wedge density to be essentially linear with
wedge length and determined the density gradient by reference to a metal
gauze of known transmittance. Subsequent experience, however, showed
that linearity could not be assumed and that more sophisticated
calibration methods were necessary (Normand and Kay, 1952, Dobson,
1957b, Walshaw, 1975).
The first density wedges were constructed from gelatin containing carbon
black sandwiched between two quartz plates, but these were found to be
subject to delamination and mould growth on the gelatin. Evaporated
metal films were later developed which had sufficient linearity (Dobson,
1968). Note that the wedge device consists of two individual density
wedges. Komhyr and Grass (1972) reported that the Canada balsam cement
which joined the two quartz plates of each wedge was not stable in
transmittance. They described a better joining method which had given
very good constancy in spectral transmittance over a period of more than
ten years in the wedge of instrument number 83. (This instrument is now
designated the World Primary Standard.)
In principle, the wedge could be calibrated independently of the Dobson
instrument, but in practice it is more accurate to calibrate it in situ,
i.e., in the same configuration as is used operationally (Normand and
Kay, 1952). Because the instrument's electrical response to intensity is
not linear, the wedge density cannot be measured directly. Instead,
the null detection system is used to obtain the change in wedge
position, ΔR, as measured by the angle R of the external dial, that is
needed to balance an applied and known change in intensity at the S3
slit, relative to a temporarily fixed intensity at either S2 or S4.
The log of the intensity ratio for the change is then equal to the wedge
density interval ΔD required to balance the change. A measurement
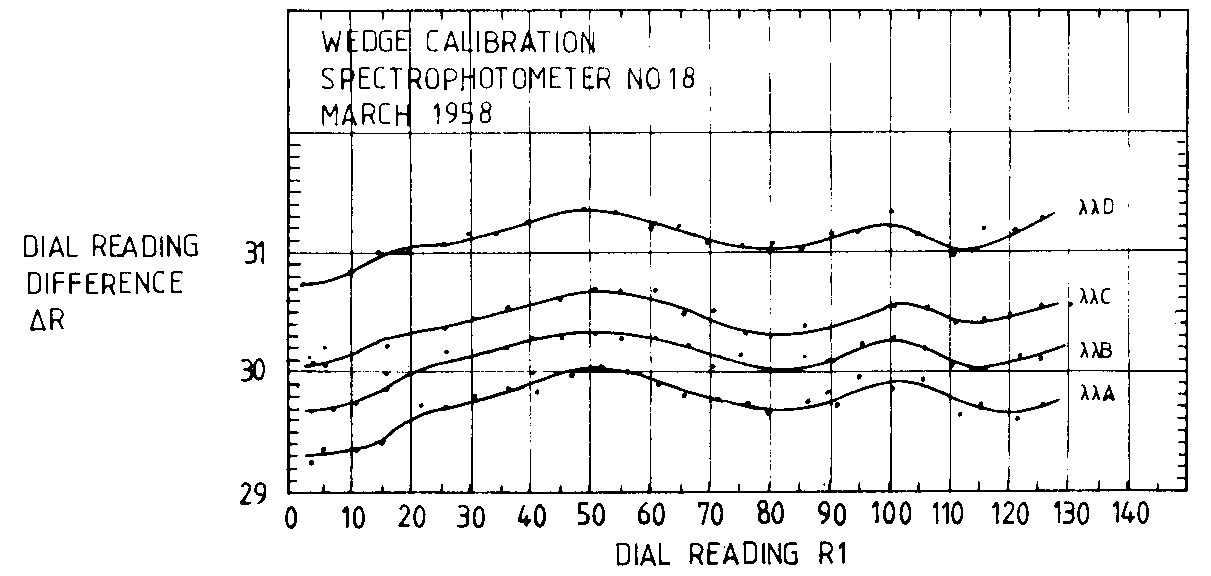
sequence usually consists of a set of ΔR measurements as a function of
R, such as is shown in Figure 3.1.

Figure 3.1  Dobson optical wedge calibration data using the two lamp method
            (data from Komhyr, 1980b).
In essence, the calibration of the wedge consists of, first, the
measurement of the coarse density gradient ΔD/ΔR as a function of dial
angle R, and second, the integration of this gradient with respect to R
to obtain the density function D(R). The unknown constant of the
integration forms part of the instrument's extraterrestrial constant
which is determined by independent means (see Section 7).
However, in practice, a more elaborate analysis procedure involving the "minor
interval" method is used to calibrate the wedges.
3.2 Apparatus
The most common means for providing known changes of intensity are the
two-source intensity doubling or halving devices, in which two sources
of closely equal intensity are alternately exposed singly and in
combination to give an intensity step of 2 and therefore a log intensity
step of 0.301. These are mounted just above the instrument's optical
entrance, and may consist of:
- two independently shuttered, closely spaced lamps (Dobson, 1957b,
Komhyr, 1980b);
- a single lamp with a beam splitter whose two separate beams can be
independently shuttered (Walshaw, 1975);
- two independently shuttered lamps whose beams are made to appear of
coincident origin (Komhyr, 1980b, Olafson et al., 1981);
- or, lastly, a single lamp above a finely perforated plate which is
shuttered by another perforated plate to expose half or all of the
holes (Funk, 1959).
The lamps available before about 1960 were large and of low wattage and
low colour temperature, and their intensities were insufficient to allow
accurate calibrations at the higher density end of the wedge. Present
day designs use small quartz halogen lamps of higher wattage and higher
colour temperature and can be used to calibrate the whole wedge. Komhyr
(1980b) reports that essentially identical results were obtained in 1977
from the Canadian device, which uses two 350 W lamps with a prism to
ensure coincident beams and is water cooled, and a United States device,
which uses two 600 W lamps side by side and is air cooled. The intensity
incident on the instrument needs to be stable to about 1% over a
measurement cycle and this requires a very stable lamp power supply,
good electrical contacts at the lamp, and good mechanical stability of
the lamp and its mount. The direct heating of the instrument, largely by
conduction, can also be a problem for lamps of large power consumption
(Walshaw, 1975, p.66).
To obtain an initial null balance for the halved intensity at the
various points along the wedge, a small lamp and diffuser is mounted in
front of slit S4, whose intensity, as measured by the instrument
detector, is adjusted until it equals the halved intensity transmitted
by the chosen part of the wedge and by S3. Slit S1 is shuttered. The
intensity of the S4 lamp should be as stable as those in the two-source
device.
The alternative method of producing intensity step changes is by means
of neutral density filters of known transmittance placed inside the
instrument in the path of one of the spectral beams, usually that
through S3. For example, before the two lamp device was developed,
neutral density filters of transmittance 0.25 and 0.75 were used to
calibrate the whole wedge (Normand and Kay, 1952). Dobson (1957b)
described the use of a rhodium plated neutral density filter to
calibrate only the optically dense part of the wedge. The filter's
transmittance was calibrated against the optically thin part which had
been calibrated with the two lamp method.
Neutral density filters are relatively easy to make and to use. They may
be made of evaporated metals on quartz plates, of perforated plates, or
of metal gauzes. Their density may be chosen to be small enough to map
small scale variations in wedge density, though it should be noted that
because of the density averaging of the S3 slit's length of about 1 cm,
such variations will be limited to the order of 0.15 in density. The
disadvantage of filters is that their transmittance must be
independently calibrated to high accuracy and must be specifically
checked for spectral transmittance variations, temperature dependences
and temporal changes. As with the two lamp devices, they must provide a
uniform intensity across the instrument's field of view, to avoid errors
associated with the instrument's spectral sensitivity variation across
the field of view (see Section 2.3), and for this
reason the use of a single variable iris aperture (Sinha and Sanyal, 1965), which is, in
effect, a very spatially non-uniform filter, cannot be recommended.
3.3 Data analysis methods
The measured (ΔR, R) data set is best checked graphically to eliminate
bad data and to ensure sufficient coverage, especially where the density
gradient varies rapidly or the data are noisy. The data are smoothed and
it is upon this smoothed curve that subsequent processing is done. The
simplest method of processing is to assume that the local density
gradient dD/dR at any value of R is equal to the coarse density gradient
ΔD/ΔR centred on R, and then to integrate ΔD/ΔR, which is
the inverse function of the (ΔR, R) function, as a function of R. Some
extrapolation at the ends of the density range would be required. This method is
briefly discussed by Dobson (1957b, p. 107).
The recommended analysis procedure in Dobson (1957b) and Komhyr (1980b)
makes use of the "minor interval" method, an ingenious procedure which
is designed to better describe small scale wedge density variations.
There appears to be no wholely mathematical description of the method in
the literature, and the descriptions of it in the above two references,
and in what follows, are in terms of the steps needed to carry it out.
The notation used below is the same as that used in the above references.
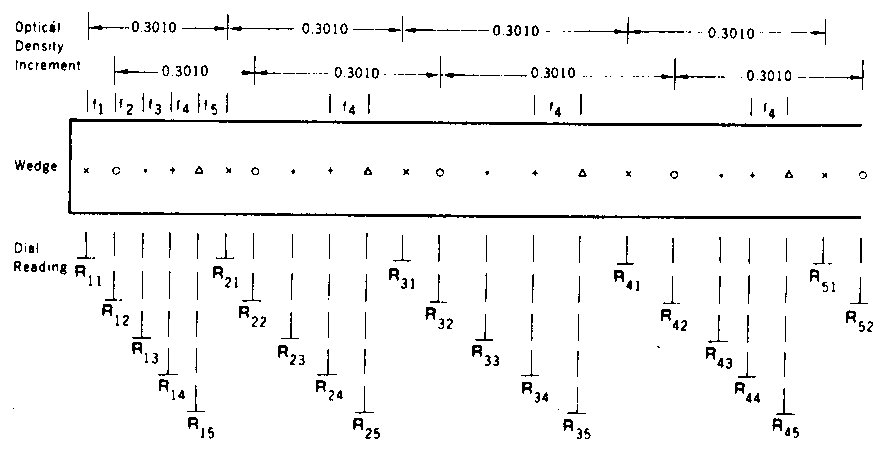
The method is illustrated in Figure 3.2. Using the (ΔR,
R) data, sequences of major density intervals F (where F equals 0.301
for a two lamp calibration) are formed along the wedge such that the
differences between successive starting points in R (and therefore also
between successive end points in R) of each sequence define a set of
unknown smaller density intervals fi. The sequence starting points in
R are chosen to divide the first major interval into five minor
intervals of approximately equal size in R. The sum of the fi, i.e.,
f1 + f2 + f3 + f4 + f5 equals F.
With some thought, it may be seen that the sequences formed repeat the minor density
intervals along the wedge. The values of fi are estimated from the R values
noted as the sequences are formed, by assuming that the local density gradient is
equal to the coarse density gradient over the major R interval in which
it is centred. If there are n major density intervals along the wedge,
it is possible to make n-l individual estimates of each fi, and these
are averaged to give the final value of each fi. The fi are then
added up and interpolated, in proper sequence, to give the density at
any point along the wedge.

Figure 3.2   Illustration of minor interval method of analysing the Dobson
             optical wedge calibration data (from Komhyr, 1980b).
The minor interval method is not easy to understand from such a brief
description, and for further details the reader should consult Dobson
(1957b) and Komhyr (1980b). It can be noted that the only significant
advantage of the minor interval method, compared to the simple
integration, is its averaging of up to ten estimates of the fi, and
the tendency for this to reduce any systematic error in the estimation
of the local gradient from the surrounding coarse gradient. The question
as to whether the application of the minor interval method is really
necessary can only be answered by an inspection of the density function
of the wedge under consideration.
3.4 Error analysis of standard methods
Let it be assumed, firstly, that there are random
uncertainties of 0.1° in the dial readings, secondly, that any
systematic measurement uncertainties in dial readings, such as due to
operator bias, tend to cancel for differences in dial readings, and
thirdly, that a suitable criterion of performance is for the uncertainty
in XA total ozone at an airmass of 1 to be less than 0.0015 atm cm
(about 0.5%). This criterion implies a wedge density uncertainty of less
than 0.0026 at a density of about 0.65, or equivalently 0.4% in density.
The corresponding density uncertainties for the C and D bandpairs are
0.35% and 0.25% respectively.
The random uncertainty for a dial reading difference, ΔR, is thus
assumed to be 0.14°. (This may be a conservative value, since the
scatter in ΔR in Figure 3.1 appears to be about
0.07°.) This results in
an uncertainty of about 2.4% in individual fi estimates for minor
intervals of approximately 6° in R, which is in reasonable agreement
with the uncertainty apparent in the experimental data of
Table 14.3 in
Dobson (1957b). If a large number of data contribute to the ( R, R)
function, then the size of the random error will reduce, for example, to
1.2% if there are four data per 6° in R, and if nine minor intervals
contribute to the average estimate of fi, then the random error in
this average will reduce to 0.4% in density, which, by coincidence,
equals the error criterion. The constraint that:
                                      n
                                      Σ fi = F                                           (3.1)
                                     i=1
within each major interval prevents this uncertainty from accumulating
along the wedge.
To minimise the random uncertainty, it is clear, firstly, that many (ΔR,
R) data are needed, say, at least four per 6° in R, and secondly that
the minor intervals should be no smaller than necessary. Since the S3
slit's length is equivalent to about 20° in R, it would seem sensible to
divide the major interval of approximately 30° into only three minor
intervals and not the five usually used.
In both the simple integration method and the minor interval method, it
is assumed that the density gradient at a point is closely equal to the
coarse density gradient of the ΔR interval in which it is centred. It is
not difficult to derive expressions for the systematic error arising
from this assumption as applied to polynomial forms. If the density
function over the ΔR interval is linear or quadratic, the error is
identically zero, but if it is cubic, the error is c(ΔR)2/4, where c
is the coefficient of the polynomial's cubic term. This means that there
will be essentially no systematic error in the density estimates made
from those parts of the (ΔR, R) function which are constant or linear,
and hence that particular weight should be given to the minor interval
fi estimates made in these parts.
The variation among a group of fi estimates will give an indication of
the size of any cubic or higher order error components present. Another
indication may be found, as follows, by comparison to the error that
would arise if the quadratic components of the (ΔR, R) function in
Figure 3.1 were neglected, i.e., if the function was represented
by a linear function. If the proportional error in ΔD/ΔR is taken as
equal to the corresponding proportional error in ΔR, i.e.:
δ(ΔD/ΔR)/(ΔD/ΔR) = δ(ΔR)/ΔR (3.2)
then the largest deviation in Figure 3.1 from a mean linear
function (a triangular shape of height δ(ΔR) = 0.25° and base length
R = 40°), would result in a density error of 0.0017, which is only about two
thirds of our error criterion. If quadratic errors are so small, then
cubic and higher order errors are likely to be insignificant. Indeed, it
would seem that for the wedge shown, the simple integration method would
give results little different to those given by the minor interval
method. However, it is possible that this wedge is a particularly linear
one and that other wedges will show greater nonlinearity.
It is necessary with the simple integration method to extrapolate the
(ΔR, R) function by ΔR/2 at either end of the wedge. Exercises similar
to that of the preceeding paragraph show that the errors associated with
these extrapolations are very small. In any case, the very low density
end does not play an important part in operational measurements, and the
errors present when the very high density end is in use will be swamped
by other instrument error sources, such as stray light.
Intercomparisons have shown that the variations with airmass (and
therefore with wedge density) of the difference between the XAD ozone
measurements made by well calibrated instruments can amount to 0.5% or
less. This shows that the wedge calibrations were accurate to at least
this level, which is the same as the criterion assumed here.
3.5 Error analysis of filter methods
The effect on wedge calibrations of the transmittance uncertainty in
fixed transmittance neutral density filters is analysed here in terms of
the error criterion used above, namely, 0.0026 in wedge density at a
density of 0.65. A filter's density D and transmittance T are related by:
T = 10-D (3.3)
and the proportional uncertainties, d and t in D and T respectively are
related by:
t = Td - 1 (3.4)
The transmittance accuracies required to ensure that the criterion of d
= 0.004 is met are given below in Table 3.1. The listed product Tt is
the actual uncertainty in transmittance.
                        TABLE 3.1

Transmittance uncertainties for various filter densities.

    D             T               t            Tt
   0.10         0.794          0.0009        0.0007
   0.15         0.708          0.0014        0.0010
   0.20         0.631          0.0019        0.0012
   0.30         0.501          0.0028        0.0014
   0.50         0.316          0.0047        0.0015
   1.00         0.100          0.0094        0.0009
   2.00         0.010          0.0187        0.0002
Table 3.1 could be used as an aid to choosing filter
transmittances. Thus to map small scale density variations directly a filter
transmittance of about (80±0.07)% might be chosen, while to provide an
approximate halving of intensity a transmittance of about (50±0.14)%
would be needed. The accuracy requirements for the filters are similar,
so the high transmittance filter may be used without serious
disadvantage. The corollary is that if a high transmittance filter is
insufficiently accurate on its own, then a similarly calibrated halving
filter would not be adequate as its calibration reference.
The most important lesson from the table is that very high accuracies,
of about 0.1%, are required of the filter transmittances. Filters may be
independently calibrated with quality laboratory spectrophotometers, but
even with very careful work these accuracies will be difficult to
obtain. Spectral and temperature dependencies and temporal variations
must also be accounted for. Transmittance accuracies are likely to be,
in general, no better than 0.5%. For these reasons, independently
calibrated filters cannot be recommended for calibrating wedges.
The standard Dobson rhodium plated filters are satisfactory, however,
because they are calibrated against the wedge's optically thin end which
has been calibrated by the two lamp method, thus making use of the
appropriate wavelength bands and the instrument's intrinsic high
accuracy for measurements of relative density. The uncertainty of
rhodium filter wedge calibrations is probably no greater than twice that
of a full two-source calibration, provided the filters' transmittances
and any temperature dependences of them are regularly checked.
3.6 Summary
(i) Modern evaporated metal wedges are very stable and
are relatively linear. The original wedges made of carbon black in
gelatin were much less stable and linear.
(ii) The wedges are best calibrated in situ, and by
means of the two-source device, which nowadays usually comprises two
cooled quartz halogen lamps. The apparatus measures a coarse density
gradient and its design and use are well established.
(iii) Neutral density filters which are independently
calibrated cannot be recommended for calibrating wedges as the
transmittance accuracy of about 0.001 (i.e., 0.1%) required of the
filters is very difficult to obtain and to maintain. The standard
rhodium plated neutral density filters are satisfactory if they are
calibrated in the standard way against the optically thin end of the wedge.
(iv) The "minor interval" method is generally the
preferred method for processing the coarse density gradient data, but
for a wedge of relatively linear gradient, a simple integration will be
sufficient. Minor intervals need be no smaller than 10° in dial angle R.
(v) To minimise systematic error, the averages of the
estimates of the minor densities fi should be weighted in favour of
those estimates determined from parts of the density gradient function
(or R, R function) which are closely linear.
(vi) Error analysis shows that, with reasonable care, a
two-source calibration can give accuracy of 0.4% in wedge density, which
is equivalent to an accuracy of about 0.5% in XA. This is supported by
field intercomparisons of Dobson instruments, the results of which
strongly suggest that the uncertainty in XAD due to wedge calibration
can be less than 0.5%.
(vii) The accuracy of wedge calibrations for gelatin carbon
wedges, and for calibrations not made with the two source device, will
be less, perhaps equivalent to about 2% in XAD.
Return to Table of Contents
Forward to Stray Light

